Basic build#
If you are building on a cluster, first check if there are specialized scripts available for your cluster at nv-legate/quickstart. Even if your specific cluster is not covered, you may be able to adapt an existing workflow.
Getting dependencies through conda#
The primary method of retrieving dependencies for Legate Core and downstream libraries is through conda. You will need an installation of conda to follow the instructions below.
Please use the scripts/generate-conda-envs.py script to create a conda
environment file listing all the packages that are required to build, run and
test Legate Core and all downstream libraries. For example:
$ ./scripts/generate-conda-envs.py --python 3.10 --ctk 11.7 --os linux --compilers --openmpi
--- generating: environment-test-linux-py310-cuda-11.7-compilers-openmpi.yaml
Run this script with -h to see all available configuration options for the
generated environment file (e.g. all the supported Python versions). See the
Dependencies section for more details.
Once you have this environment file, you can install the required packages by creating a new conda environment:
conda env create -n legate -f <env-file>.yaml
or by updating an existing environment:
conda env update -f <env-file>.yaml
Building through install.py#
The Legate Core repository comes with a helper install.py script in the
top-level directory, that will build the C++ parts of the library and install
the C++ and Python components under the currently active Python environment.
To add GPU support, use the --cuda flag:
./install.py --cuda
You can specify the CUDA toolkit directory and the CUDA architecture you want to
target using the --with-cuda and --arch flags, e.g.:
./install.py --cuda --with-cuda /usr/local/cuda/ --arch ampere
By default the script relies on CMake’s auto-detection for these settings.
CMake will first search the currently active Python/conda environment
for dependencies, then any common system-wide installation directories (e.g.
/usr/lib). If a dependency cannot be found but is publicly available in source
form (e.g. OpenBLAS), cmake will fetch and build it automatically. You can
override this search by providing an install location for any dependency
explicitly, using a --with-<dep> flag, e.g. --with-nccl and
--with-openblas.
For multi-node execution Legate can use GASNet (use
--network gasnet1 or --network gasnetex) or UCX (use
--network ucx).
With gasnet1 or gasnetex, GASNet will be automatically downloaded and built,
but if you have an existing installation then you can inform the install script
using the --with-gasnet flag. You also need to specify the interconnect network
of the target machine using the --conduit flag.
With UCX, the library must be already installed and --with-ucx can be used
to point to the installation path if UCX is not installed under common system paths.
At least version 1.14 is required, configured with --enable-mt.
Compiling with networking support requires MPI.
For example this would be an installation for a DGX SuperPOD:
./install.py --network gasnet1 --conduit ibv --cuda --arch ampere
Alternatively, here is an install line for the Piz-Daint supercomputer:
./install.py --network gasnet1 --conduit aries --cuda --arch pascal
To see all available configuration options, run with the --help flag:
./install.py --help
Advanced topics#
Dependency listing#
OS (--os flag on generate-conda-envs.py)#
Legate has been tested on Linux and MacOS, although only a few flavors of Linux such as Ubuntu have been thoroughly tested. There is currently no support for Windows.
Python >= 3.9 (--python flag)#
In terms of Python compatibility, Legate roughly follows the timeline outlined in NEP 29.
C++17 compatible compiler (--compilers flag)#
For example: g++, clang, or nvc++. When creating an environment using the
--compilers flag, an appropriate compiler for the current system will be
pulled from conda.
If you need/prefer to use the system-provided compilers (typical for HPC
installations), please use a conda environment generated with --no-compilers.
Note that this will likely result in a
conda/system library conflict,
since the system compilers will typically produce executables
that link against the system-provided libraries, which can shadow the
conda-provided equivalents.
CUDA >= 10.2 (--ctk flag; optional)#
Only necessary if you wish to run with Nvidia GPUs.
Some CUDA components necessary for building, e.g. the nvcc compiler and driver
stubs, are not distributed through conda. These must instead be installed using
system-level packages. If these
are not installed under a standard system location, you will need to inform
install.py of their location using --with-cuda.
Independent of the system-level CUDA installation, conda will need to install an
environment-local copy of the CUDA toolkit (which is what the --ctk flag
controls). To avoid versioning conflicts it is safest to match the version of
CUDA installed system-wide on your machine
Legate is tested and guaranteed to be compatible with Volta and later GPU architectures. You can use Legate with Pascal GPUs as well, but there could be issues due to lack of independent thread scheduling. Please report any such issues on GitHub.
CUDA Libraries (optional)#
Only necessary if you wish to run with Nvidia GPUs.
The following additional CUDA libraries are required:
curand(only necessary to provide this if building without CUDA support; CUDA-enabled installations will use the version bundled with CUDA)cutensor>= 1.3.3 (included in conda environment file)nccl(included in conda environment file)thrust>= 1.15 (pulled from github)
If you wish to provide alternative installations for these, then you can remove
them from the environment file (if necessary) and pass the corresponding
--with-<dep> flag to install.py.
Build tools#
The following tools are used for building Legate, and are automatically included in the environment file:
cmakegitmakeninja(this is optional, but produces more informative build output)rustscikit-build
OpenBLAS#
This library is automatically pulled from conda. If you wish to provide an
alternative installation, then you can manually remove openblas from the
generated environment file and pass --with-openblas to install.py.
Note that you will need to get a Fortran compiler before you can build OpenBLAS
from source, e.g. by pulling fortran-compiler from conda-forge.
If you wish to compile Legate with OpenMP support, then you need a build of OpenBLAS configured with the following options:
USE_THREAD=1USE_OPENMP=1NUM_PARALLEL=32(or at least as many as the NUMA domains on the target machine) – TheNUM_PARALLELflag defines how many instances of OpenBLAS’s calculation API can run in parallel. Legate will typically instantiate a separate OpenMP group per NUMA domain, and each group can launch independent BLAS work. IfNUM_PARALLELis not high enough, some of this parallel work will be serialized.
Numactl (optional)#
Required to support CPU and memory binding in the Legate launcher.
Not available on conda; typically available through the system-level package manager.
MPI (--openmpi flag; optional)#
Only necessary if you wish to run on multiple nodes.
Conda distributes a generic build of OpenMPI, but you may need to use a more
specialized build, e.g. the one distributed by
MOFED,
or one provided by your HPC vendor. In that case you should use an environment
file generated with --no-openmpi.
Legate requires a build of MPI that supports MPI_THREAD_MULTIPLE.
Infiniband/RoCE networking libraries (optional)#
Only necessary if you wish to run on multiple nodes, using the corresponding networking hardware.
Not available on conda; typically available through MOFED or the system-level package manager.
UCX >= 1.14 (--ucx flag; optional)#
Only necessary if you wish to run on multiple nodes, using the UCX Realm networking backend.
A build of UCX configured with --enable-mt is required.
The build of UCX available on conda might not include support for the particular
networking hardware on your machine (or may not be optimally tuned for such). In
that case you may want to use an environment file generated with --no-ucx,
get UCX from another source (e.g. MOFED, the system-level package manager, or
compiled manually from source), and pass the location of your installation to
install.py (if necessary) using --with-ucx.
Alternative sources for dependencies#
If you do not wish to use conda for some (or all) of the dependencies, you can
remove the corresponding entries from the environment file before passing it to
conda. See the install.py section for
instructions on how to provide alternative locations for these dependencies to
the build process.
Note that this is likely to result in conflicts between conda-provided and system-provided libraries.
Conda distributes its own version of certain common libraries (in particular the
C++ standard library), which are also typically available system-wide. Any
system package you include will typically link to the system version, while
conda packages link to the conda version. Often these two different versions,
although incompatible, carry the same version number (SONAME), and are
therefore indistinguishable to the dynamic linker. Then, the first component to
specify a link location for this library will cause it to be loaded from there,
and any subsequent link requests for the same library, even if suggesting a
different link location, will get served using the previously linked version.
This can cause link failures at runtime, e.g. when a system-level library happens to be the first to load GLIBC, causing any conda library that comes after to trip GLIBC’s internal version checks, since the conda library expects to find symbols with more recent version numbers than what is available on the system-wide GLIBC:
/lib/x86_64-linux-gnu/libstdc++.so.6: version `GLIBCXX_3.4.30' not found (required by /opt/conda/envs/legate/lib/libarrow.so)
You can usually work around this issue by putting the conda library directory first in the dynamic library resolution path:
LD_LIBRARY_PATH="$CONDA_PREFIX/lib:$LD_LIBRARY_PATH"
This way you can make sure that the (typically more recent) conda version of any common library will be preferred over the system-wide one, no matter which component requests it first.
Building through pip#
Legate Core is not yet registered in a standard pip repository. However, users can still use the pip installer to build and install Legate Core. The following command will trigger a single-node, CPU-only build of Legate Core, then install it into the currently active Python environment:
$ pip install .
or
$ python3 -m pip install .
Legate relies on CMake to select its toolchain and build flags. Users can set
the environment variables CXX or CXXFLAGS prior to building to override the
CMake defaults.
Alternatively, CMake and build tool arguments can be passed via the
CMAKE_ARGS/SKBUILD_CONFIGURE_OPTIONS and SKBUILD_BUILD_OPTIONS
environment variables:
$ CMAKE_ARGS="${CMAKE_ARGS:-} -D Legion_USE_CUDA:BOOL=ON" \
  pip install .
An alternative syntax using setup.py with scikit-build is
$ python setup.py install -- -DLegion_USE_CUDA:BOOL=ON
Building through pip & cmake#
pip uses scikit-build
in setup.py to drive the build and installation. A pip install will trigger three general actions:
CMake build and installation of C++ libraries
CMake generation of configuration files and build-dependent Python files
pip installation of Python files
The CMake build can be configured independently of pip, allowing incremental C++ builds directly through CMake.
This simplifies rebuilding the C++ shared libraries either via command-line or via IDE.
After building the C++ libraries, the pip install can be done in “editable” mode using the -e flag.
This configures the Python site packages to import the Python source tree directly.
The Python source can then be edited and used directly for testing without requiring another pip install.
There are several examples in the scripts folder. We walk through the steps in
build-separately-no-install.sh here.
First, the CMake build needs to be configured:
$ cmake -S . -B build -GNinja -D Legion_USE_CUDA=ON
Once configured, we can build the C++ libraries:
$ cmake --build build
This will invoke Ninja (or make) to execute the build. Once the C++ libraries are available, we can do an editable (development) pip installation.
$ SKBUILD_BUILD_OPTIONS="-D FIND_LEGATE_CORE_CPP=ON -D legate_core_ROOT=$(pwd)/build" \
  python3 -m pip install \
  --root / --no-deps --no-build-isolation
  --editable .
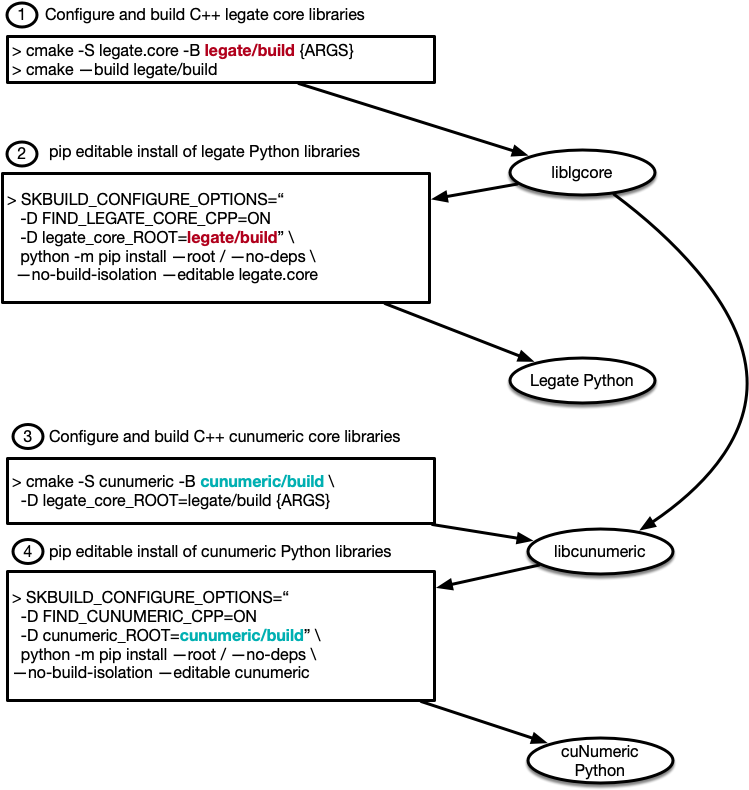
The Python source tree and CMake build tree are now available with the environment Python for running Legate programs. The diagram below illustrates the complete workflow for building both Legate core and a downstream package, cuNumeric