Overview#
The build system is designed to enable two different modes of use:
Simple
pip installfor usersHighly customizable incremental builds for developers
We review each of these modes with examples.
Building for Users#
Using install.py#
For releases <= 22.07, the main method for building cuNumeric was the install.py script.
Although the underlying implementation has significantly changed, install.py still supports the
same usage and same set of flags. For a full list of flags, users can run:
$ ./install.py --help
Using Conda#
cuNumeric can be installed using Conda by pointing to the required channels (-c):
conda install -c nvidia -c conda-forge -c legate legate-core
Using pip#
cuNumeric is not yet registered in a standard pip repository. However, users can still use the pip installer to build and install cuNumeric. After downloading or cloning the cunumeric source, users can run the following in the cunumeric folder:
$ pip install .
or
$ python3 -m pip install .
This will install cuNumeric in the standard packages directory for the environment Python.
Note: This is currently not sufficient for running cuNumeric programs. cuNumeric relies
on the legate launcher from Legate core, which must be installed separately.
For details on installing Legate, consult the Legate repository.
Advanced Customization#
If users need to customize details of the underlying CMake build, they can pass
CMake flags through the SKBUILD_CONFIGURE_OPTIONS environment variable:
$ SKBUILD_CONFIGURE_OPTIONS="-D Legion_USE_CUDA:BOOL=ON" \
  pip install .
An alternative syntax using setup.py with scikit-build is
$ python setup.py install -- -DLegion_USE_CUDA:BOOL=ON
Building for Developers#
Overview#
pip uses scikit-build
in setup.py to drive the build and installation. A pip install will trigger three general actions:
CMake build and installation of C++ libraries
CMake generation of configuration files and build-dependent Python files
pip installation of Python files
The CMake build can be configured independently of pip, allowing incremental C++ builds directly through CMake.
This simplifies rebuilding libcunumeric.so either via command-line or via IDE.
After building the C++ libraries, the pip install can be done in “editable” mode using the -e flag.
This configures the Python site packages to import the Python source tree directly.
The Python source can then be edited and used directly for testing without requiring a pip install.
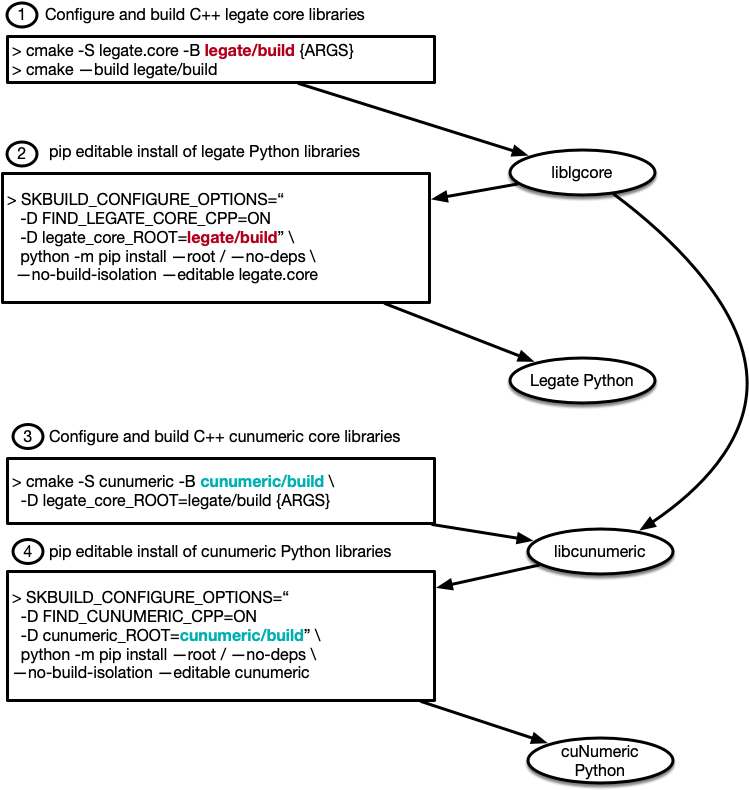
Example#
There are several examples in the scripts folder. We walk through the steps in the build-with-legate-separately-no-install.sh here.
We assume a pre-existing Legate CUDA build. For details on building Legate, consult the Legate repository.
First, the CMake build needs to be configured:
$ cmake -S . -B build -GNinja -D legate_core_ROOT:STRING=path/to/legate/build
We point cuNumeric to the Legate build tree, not an installation. This generates all build-dependent headers and Python files. Once configured, we can build the C++ libraries:
$ cmake --build build
This will invoke Ninja (or make) to execute the build. Once the C++ libraries are available, we can do an editable (development) pip installation.
$ SKBUILD_BUILD_OPTIONS="-D FIND_CUNUMERIC_CPP=ON -D cunumeric_ROOT=$(pwd)/build" \
  python3 -m pip install \
  --root / --no-deps --no-build-isolation
  --editable .
The Python source tree and CMake build tree are now available with the environment Python for running cuNumeric programs. The diagram below illustrates the complete workflow for building both Legate core and cuNumeric.